

Gill met with Yannis, Daniel and Robert to demonstrate how to use a set of visual elements to construct a conceptual figure describing oxytocin administration for their upcoming journal paper. Gill had already prepared Adobe Illustrator files for each of the visual elements that would make up the figure – see this blog post for details – and had constructed an initial figure to act as a starting point. The CNS department had also acquired licences for the latest version of the Illustrator software, and Yannis was able to make use of one of these licences.
The aim of the meeting was not to construct the final figure there and then, but for Gill to demonstrate how the visual elements worked – how they could be edited and combined – and to then leave the Illustrator files for the neuroscientists to work with themselves.
The points discussed in the meeting, and some general guidelines for constructing conceptual figures, are outlined in this blog post. The five visual elements created for the figure are included below for reference:
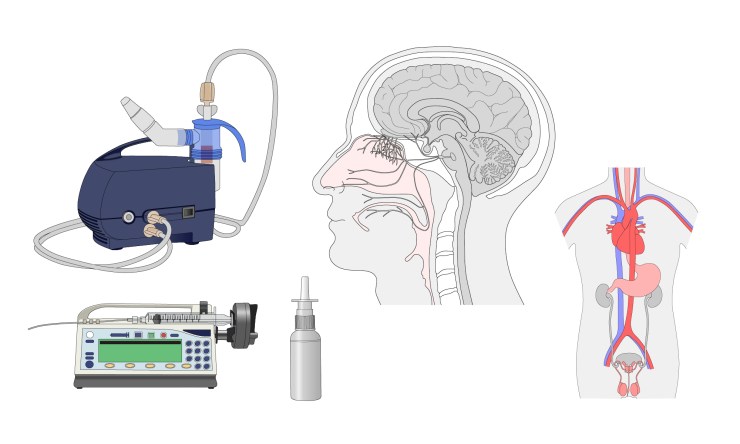
- Prior to constructing the figure, be sure to familiarise yourself with the files containing the individual elements. Toggle the visibility of the layers off and on to see what is contained on each layer. This is particularly important for the more complex visual elements such as the human torso (described in detail in this blog post) and the human head (described in this blog post).
- Before making any changes to an Illustrator file, make a copy and name and date it so that you will recognise it. Then if something goes wrong you will always have the original file to go back to. Similarly, ‘save’ and ‘save as’ the file regularly if you are making a lot of edits.
- Keep a layer locked until you need to edit it, or to copy something into it. This will avoid inadvertently deleting or changing the image. Apple Z, on a Mac, and Ctrl Z, on a PC, will undo any mistakes, and there is no limit to the number of undos.
- Make all required edits and changes to each individual file before combining them with another file and certainly before combining all of the elements into the final conceptual figure. For example, for the header image to this blog post, the trigeminal nerve in the human head was edited before the nasal inhaler file was placed into the human head file and combined with the head to show the inhaler inside the nostril. The combined head / inhaler file can then be placed into the final figure file. Once an Illustrator file has been ‘placed’ into another file, it cannot be edited inside that file. You will have to go back to the original Illustrator file, make the edit, and then ‘re-place’ the file.
- Before editing the contents of a single layer, it is a good idea to duplicate that layer, lock one of the copies and make it invisible. Then if the editing goes wrong, or if you decide to revert to the original, you will still have that unedited layer available in the file.
- Once the various visual elements have been placed into the same Illustrator file to form the final figure, create a separate layer in that file for any graphic elements (such as arrows) and another layer for text and annotation. This makes it easier if, in the future, you wish to reuse the figure but alter the text. You can either make the text and annotation layers invisible, export the file as an image, and then add text in another software package as and when necessary. Or you can duplicate the text layer in Illustrator, make one copy invisible and edit the text in the other copy.
- Complex visual elements can contain a lot of layers so be sure to name all layers appropriately, lock and toggle off the visibility of layers you don’t immediately need for the image, and delete any layers that you are sure are no longer required.
Yannis, Daniel and Robert were all keen to try editing and combining the Illustrator files for themselves. In particular, they would require an image of the nebuliser inhaler combined with the human head, but still with the tube leading from the inhaler to the nebuliser itself. It should be possible to create that image with some editing of the files that Gill had provided, so she left them to it for the time being. The guides to using Adobe Illustrator that Gill had written for Workshop 2 last November were still available, and would provide some step-by-step guidance. There will be an update on the construction of this conceptual figure in due course.

One Reply to “”